Showing posts with label Ribbon. Show all posts

Friday, September 13, 2013

Wrap it up Nice!

So,  don't know about you, but I LOVE presents. Getting them, giving them, opening them! I also LOVE pretty, done-up-more-than-necessary things! the more decor and detail, the more I love it! So when Pinterest started showing me all those adorable gift wrapping ideas, I decided I needed to join the club! Here are a few of my creations: 

This one was for my friend's Bachelorette party, so I made a corset box. It was a little trickier threading the ribbon through than I anticipated, but I think it turn out awesome! 


Then, of course there is my Fairy Godmother kit wrapping. I tried to theme this all around what I think a fairy would use. As you can see, there's a golden doily wrapped in rafia, tissue paper roses glittery leaves, flower adorned boxes... I really had fun with this one! 


And one I didn't show in my Fairy Godmother Kit:


How cute is this?! It was a Christmas themed box. So I just cut some pieces off of a brown paper bag, taped them on with wasi tape, and stamped a cute butterfly! The top is from a candle that has long run out! How fun, right?!


This next one is a wedding gift. There's a dollar store close to my house that has champagne glasses. SO FUN! so I tend to go spend ALL my money there. If you see a gift basket, it's probably a dollar store deal. (it really has the greatest stuff!) Anyway, since dollar store treats aren't especially fancy, I splurged and got some Martinelli's and Lindor chocolates too! Then I added the burlap, lace, and ribbons to the bucket. I think it turned out SO PERFECT! 


This next one is a birthday gift to my mom. I had a necklace hiding in the candy. This one was a quick one too, but I like how it turned out. I spray painted the jar silver (you guys, I LOVE spray paint!) Then I just dove into my cave of craft supplies and surfaced with what you see! Again, I think it turned out quite presentable, don't you? 


final touch, a swatch of fabric with the lid. 


Remember what I said about gift baskets? Yep! Dollar store! All except the Martinelli's. This was a real grab-n-go gift, so this is the only picture I managed to get. It has matching oven mits, hand towels, bowl, and green rubber spatula, tongs, and spoon! (and the champagne glasses too, of course!) Fun, huh?! It's seriously the greatest dollar store I have yet to find!


And lastly, for the chocolate lover! I have chocolate covered cherries in tulle with a crocheted flower (yes, I crocheted it myself!)  tying it together, tied into a ribbon with a Hershey's bar! Classic! 


So there you have it! Another brilliant way to let the creativity out! 


Just as a word of relief:  This isn't for everyone. I have heard a lot of complains about how Pinterest and sites like it are making holidays and parties and food impossible and ruining self esteem. This is something that makes me happy, which is why I do it. I don't want anyone to see this and feel they need to do the same to be a good person or to keep up. Do what you love! If you just enjoy looking at the cute stuff, but have no desire to make it yourself, GREAT! But if you do happen to be similar to myself, I hope I can inspire you and regardless of how you are, I hope you share your talents with the world!  

Fairy Godmother Kit

So, in my family, I have an aunt who was always pretty special in my life. Unfortunately, she lives across the entire country. So, when my li'l girl was born, I wanted to make her a part of my children's lives somehow. This is what I came up with:
Winner, right?! And the first thing I did once I came up with the idea was search the Internet for "fairy godmother kits" guess what it came up with... NOTHING! I know! I was shocked too!! You mean the artsy people who have made Pinterest what it is HAVEN'T come up with this yet?! I am very disappointed, artsy people. VERY disappointed. 
BUT that did mean I got to invent it all by myself. Which was fun! I wish I would have taken a year to put this together because I have found SO much stuff since that would have been PERFECT!! But that's okay! There are definitely more packages in the future. 
Anyway, I was super lame and didn't take pictures of most of the stuff :( so you just get these couple pictures. But you do get to see my super cute wrapping! And really, isn't that just so cute? I will tell you what I pit in the kit, so you can make your own! I didn't make most of these, because of the sheer amount I wanted to send, and I was trying to get it done ASAP, but I have seen lots of DIY for just about all of it. 
Kit includes: 
1: wings, crown, and wand- OF COURSE! What's a fairy without these? You can see the wand in this picture. It's the purple butterfly in the bottom left corner. Cute, right?! 
2: Fairy Party and Planning Book: "for when you are just too tired to think" ha! it was a very cute book filled with recipes, party ideas, decorations, etc. 

3: Cozy Comforts: have you seen those home-made heating pads? They are filled with corn or rice or beans or something, and you just heat them up in the microwave and put them on your shoulders? Yeah, it's one of those! Because being a Fairy Godmother is probably tough! 
4: Angel Pin: just a little broach to remind her she's my daughter's guardian angel!
5: Soaps: So I have a friend who makes her own soaps (they are AMAZING! I don't use any other kind of soap!) and when I told her about this, she found me some champagne scented soap with glitter on top (PERFECT! am I right?!), a cinnamon one with an actual cinnamon stick sticking out of it, and a pine scented one (fairies are all woodsy and stuff, right? Actually this one was my favorite and I'm DYING to buy another one for her for my own use!) They were such a perfect touch to the whole package! 
6: A Token of Love: this was just a little metal heart, but it was so cute and cheap I figured what the heck! 
7: Frame (with 3 pictures): I didn't think she had any pictures of my darling girl, so I found a cheap wooden frame, stained it all dark and pretty, and added spiraling rhinestones around for a fancy border! 
8: Bonus: Just a bit of fairy dust: My friend also had mini jars  (like the size of my thumb) with glitter and super tiny shells inside! It was SO CUTE! and she was so nice to let me have one!! 

How cool and creative is this?!?!?!


So there you have it! FIRST EVER Fairly Godmother kit! 
I hope I see more on Pinterest in the future! ;) 

Cost: You guys, I don't even know! Definitely at LEAST $50. But you could cut that down MAJORLY by making your own stuff!
Time: it took me two months to wrangle stuff together, wrap, and mail. 

Wednesday, July 11, 2012

Scrapbooking!

Have you ever heard of the Rusty Pickle? They were a company who made scrapbook packets, and then give you instructions on how to make the pages. It's nice because you still get the joy of scrapbooking, without all the hemming and hawing of what paper you want to go with what for which event. (I think they went out of business, which is too bad. It really was a cool idea) So I have a few of these packets, but I don't have all the tools necessary for putting them together, so I mostly made up my own. So here's what they wanted me to make
 And these are the instructions that come with them.
Yeah right... 

So these are the pages I came up with


I think they turned out just darling! Now all I need is to print some pictures.... 

Time: 1 hour
Cost: ?? They went out of business :/

Baby Mobile... Of Sorts

You may remember my baby girl 

Isn't she the cutest?! 

So, being poor (yes, it's a common theme right now) we didn't really have money for toys for our cute girl, so one day my husband comes to me and says "You should just whip together a mobile with some fabric toys from the scraps you have so she has something she can look at."
Well, okay... 
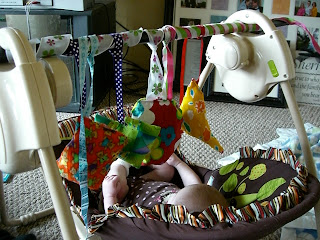
So, with that as background understanding, here is what I came up with:
Not the best, cutest, or most easy to deal with mobile ever, but it keeps her happy. 
So here's what I have to work with:
 My fabric

 My ribbon


Raffia
 And a sewing machine. 
As you can see, I just stuffed raffia in the middle to give them dimension.
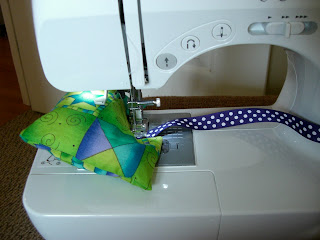
And sewed them up... 

All around the machine... I am a dork!
All sewn up

For the final part, I just wrapped the end ribbon pieces around a cane my husband used for our wedding. Not too bad for an on-the-spot project!

Time: less than an hour
Cost: free!

Tuesday, April 10, 2012

Birthday Liter

So, as many of you out there probably can relate, I have become a lover of Pinterest. So, when my brother's birthday rolled around in October (I know, so long ago!) I perused my boards and found this nifty idea. 


So, what you do is you get a two (or in this case three) liter bottle of soda (preferably one you enjoy) and empty the contents. Of course if you have a bottle just laying around, that's probably best. Anyway, once emptied, you clean the bottle out so it's not sticky, an cut a hole in the side where the name of the soda is. I recall this being tricky. I believe I had to stab it with a knife, then try and wiggle my scissors into it to cut it open, so be careful when you attempt this. I made three cuts so it could open like a lid and proceeded to fill it. My brother is a sugar-holic, so I just filled it with lots of candy from the dollar store. Depending on your recipient though, you could fill it with yo-yo's, bouncy balls, small dolls, coins, dollar bills, chap stick, make-up, cards... anything you think they would like that will fit. Next, you tape up the hole, cover the side with cute paper, and add a label if you would like. I just turned the wrapping paper around and used the white side. Also, I would suggest writing on it before you tape it to the bottle-much easier that way. Then I got some fun matching ribbons and tied them on top and added a bow and voila! A cute birthday present that everyone can love!
Time: An hour or so
Cost: I spent about $10 but it could easily cost more or less depending on what you fill it with.

Monday, November 7, 2011

Autumn Wreath

My apartment is in desperate need of some cute fall spirit, so for Craft Night, I made this cute wreath!

Here is how I made it: 
First I got the idea to go collect leaves from around my neighborhood and put them in my flower press.

Then I "laminated" them using tape and cut them out to add to my wreath.

For the base of the wreath, I went to Home Depot and bought an insulating foam tube for $1. 98 or something about that price range (which is better than the $7 for a styrofoam base from a craft store). I didn't really play with it much to try and get it to be more circular, so it ended up kind of egg-shaped.  I think if you worked with it a little, it wouldn't be too difficult to make it more circular. I'll let you know when I try making my Christmas wreath.

All the rest of the material I already had lying around. Fake sunflowers from the dollar store, three or four different types of ribbon, the cloth looks like burlap, but it was just more of a weave my mom had laying around, and rafia.

For design, I just kind of placed the materials on with my fingers and decided whether I liked it or not, and then hot glued it. WARNING the hot glue with deform the foam tube. I made sure there was a good holding on the duct tape with the fabric, and then just glued everything to the fabric.
Here's the final product again :)


Total Time: about 3 hours. This is largely due to the fact that I wasn't following a certain pattern design and the fact that I've never made a wreath before. Most of that time was me trying to figure out what a good wreath should look like and where I wanted to place my material. 
Total Cost: $1.98 for the tube. But if you're buying fabric to cover it, ribbon, etc. it could add up to around $20 or $30, depending on how nice of fake flowers and ribbon you got.

Projects I'm currently working on:
~A baby quilt for my baby girl coming in January
~Autumn pillows with leaf applique 
~Garland to match this cute wreath

Keep crafting!

Wednesday, October 12, 2011

50's Summer Dress

In 2009, I decided I wanted to be a 50's chick for Halloween. So, I found this super quick pattern, and some fabric hiding in a closet and sewed together a dress in three days! True story! It did drive be nuts at a few points within those three days, but I finished it! 
This is the only picture I have of the whole dress, and it doesn't show the bottom well, but it gives you a good idea. So the dress is just one piece. You put the dress over your head, then bring the front around and button it in back, and bring the back around and button it in front, so it looks like a vest. In the picture, the bottom part with the blue edging actually comes down to my knees to make a full skirt. Also hiding in the closet was ribbon made from the same material as the dress, so the headband and the dress match perfectly!

Total cost: All I bought was the blue edging and 6 buttons, so the cost was less than $10, I believe
Total time: I know for a fact I start Monday and finished Wednesday, but the hours I'm unsure of. probably around 20 hours. I know my mom and all her sewing friends were impressed with how quickly my first major sewing project went.

Sunday, October 9, 2011

Engagement Dress

I love the 1950's! For our engagement pictures, we decided we wanted to do vintage pictures of different era's, so I made a dress. Not only does it LOOK vintage, but the pattern I used was from my grandma from when the dress was actually in style! How fabulous is that?! 
 As you can see from the pictures, it was a fairly simple dress. It has a zipper on the side to get in and out, which is actually quite tricky, especially since the pattern was missing sleeve pieces, and the sleeves I made were too long and skinny to slip in and out with ease.
The dress had a very wide neck, very simple, and I also sewed a few extra scraps to use as ribbons in my hair. 
The most time consuming part was probably the pleated skirt, although it really wasn't too difficult, except when I needed to size it down to fit my hips. All in all, not too bad. 
Also part of the pattern was a belt, which is super cute! you can see it slightly in this picture. It also wanted me to make a drapery to hang from the belt, but I was using cloth that was given to me, and I didn't have enough to make the drapery. 

Total time: about 20 hours
Total cost: since the fabric was free, just thread and the belt loops were purchased. under $5